terraform & timestamp

ich möchte in unseren automatisch Deployments immer das Datum des Vorgang in der virtuellen Kiste haben. Ich hab das erreicht indem ich Funktionen timestamp und formatdate von terraform verwende.

In den Variablen für cloud-init verwende ich :
vars = {
                hostname = "${var.vsphere_name}${var.vsphere_dom}"
                deploy_date = formatdate ("DD'.'MM'.'YYYY hh:mm ZZZ",timestamp())
        }
weiterführender Link : terraform & cloud-init & vmware
Quelle :
https://www.terraform.io/docs/configuration/functions/timestamp.html
https://www.terraform.io/docs/configuration/functions/formatdate.html

terraform & cloud-init : change root password

um bei einem automatischen deployment mit terraform & cloud-init das root passwort zu ändern einfach im cloud-init bereich chpasswd einfügen.

chpasswd:
  list: |
     root:$6$hNnmxD4HhIeX4IlB$pLkby1WsEbTIRnA9hg8UtSAhoG0Gd4eFF5HUxam8x5O4Ch4KgA62lW/4Ora12fkczq3OCXzMHdj7jnpzUTJDb/

zuvor den password hash mit python erstellen.
python3 -c 'import crypt,getpass; print(crypt.crypt(getpass.getpass(), crypt.mksalt(crypt.METHOD_SHA512)))'
Password:
$6$hNnmxD4HhIeX4IlB$pLkby1WsEbTIRnA9hg8UtSAhoG0Gd4eFF5HUxam8x5O4Ch4KgA62lW/4Ora12fkczq3OCXzMHdj7jnpzUTJDb/
weiterführender Link : terraform & cloud-init & vmware
Quelle : Red Hat - setting up cloud-init

Proxmox / Qemu konvertieren einer HDD

Unser Azubi hat hier zum spielen ein Proxmox aufgebaut. Den Server den er hier installiert hatte muss ich jetzt in unsere VM-Ware Umgebung übernehmen. Da ich jetzt den Weg Proxmox -> VMware benötige konvertiere ich das alles mit qemu-img in das vmdk Format.

1.) Schauen wir uns die Konfiguration der VM an.
cat /etc/pve/nodes/xxx/qemu-server/100.conf 

bootdisk: scsi0
cores: 2
ide2: local:iso/14393.0.161119-1705.RS1_REFRESH_SERVER_EVAL_X64FRE_DE-
DE.ISO,media=cdrom
memory: 12288
name: servername.home.box
net0: e1000=1A:AF:17:D8:B0:44,bridge=vmbr0,firewall=1
numa: 0
ostype: l26
sata0: local-lvm:vm-100-disk-0,size=80G
sata1: zfs-storage:vm-100-disk-0,size=800G
scsihw: virtio-scsi-pci
smbios1: uuid=5c3fa82f-83a6-4206-92e7-34ac8fa38100
sockets: 1
vmgenid: c399e3ee-37c9-4b48-bb3b-585905633f84
BEVOR man an den HDDs rumspielt ein Backup erstellen !

2.) jetzt schauen wir uns mal an was so an Platten rumliegt und suchen uns die richtige raus
pvesm list local-lvm

local-lvm:vm-100-disk-0   raw 85899345920 100
local-lvm:vm-101-disk-0   raw 17179869184 101
local-lvm:vm-102-disk-0   raw 12884901888 102
local-lvm:vm-103-disk-0   raw 34359738368 103
local-lvm:vm-104-disk-0   raw 34359738368 104
wir brauchen hier die vm-100-disk-0 dafür lesen wir jetzt mal den Speicherort aus.
pvesm path local-lvm:vm-100-disk-0

/dev/pve/vm-100-disk-0
mit folgenden Befehl konvertiere ich die erste hdd in vmdk
qemu-img convert -f raw -O vmdk /dev/pve/vm-100-disk-0 ~/root_c.vmdk

3.) jetzt machen wir das selbe für die 2. hdd die liegt allerdings im zfs-storage ab
pvesm list zfs-storage

zfs-storage:vm-100-disk-0   raw 858993459200 100

4.) Naja ich hab keinen Bock 800G zu konvertieren deswegen shrink ich das Teil einfach mal ein wenig.

Wenn ihr die HDD zu weit verkleinert sind alle Daten verschwunden ! ZUERST PRÜFEN WIEVIEL GB an DATEN auf der HDD liegt !!


4.1.) Erstmal müsste ihr im installierten System sicherstellen wieviele GB ihr braucht
4.2.) Dann im System die Partition verkleinern (bei mir waren das 40G)
4.3.) Nun kann man die HDD auf die gewünscht Größe shrinken ich hab mich für 50G entschieden.
zfs set volsize=50G zfs-storage/vm-100-disk-0
nachdem das durchgelaufen ist muss der Eintrag in der Konfigurationsdatei noch angepasst werden.
aus sata1: zfs-storage:vm-100-disk-0,size=800G wird sata1: zfs-storage:vm-100-disk-0,size=50G

5.) wir lesen wieder den Speicherort aus
pvesm path zfs-storage:vm-100-disk-0

/dev/zvol/servername/vm-100-disk-0

6.) und konvertieren wieder
qemu-img convert -f raw -O vmdk /dev/zvol/servername/vm-100-disk-0 ~/hdd_d.vmdk

7.) naja ich konvertiere das nochmal über die vmkfstools
vmkfstools -i root_c.vmdk system.vmdk -d thin -a buslogic
Destination disk format: VMFS thin-provisioned
Cloning disk 'root_c.vmdk'...
Clone: 52% done.

vmkfstools -i hdd_d.vmdk data.vmdk -d thin -a buslogic
Destination disk format: VMFS thin-provisioned
Cloning disk 'hdd_d.vmdk'...
Clone: 36% done.

Quellen :
https://forum.proxmox.com/threads/shrink-zfs-disk.45835/
https://kb.vmware.com/s/article/1028042

SSH : Keine Verbindung auf altes NAS möglich

Ich habe neulich einem Kumpel geholfen der auf sein altes NAS über SSH zugreifen wollte. Leider ist die Firmware von diesem NAS etwas älter und er bekam immer nur diese Fehler Meldung
Unable to negotiate with X.X.X.X port 22: no matching key exchange method found. Their offer: diffie-hellman-group1-sha1
nachdem ich den Host auf diffie konfiguriert hatte erhielt ich diese Fehler Meldung
Unable to negotiate with X.X.X.X port 22: no matching cipher found. Their offer: aes128-cbc,3des-cbc,aes256-cbc,twofish256-cbc,twofish-cbc,twofish128-cbc,blowfish-cbc
man das nervt dann auch die Cipher konfiguriert und schon konnten wir über ssh zugreifen.

Hier der Auszug aus der Datei ~/.ssh/config
Host X.X.X.X
    KexAlgorithms +diffie-hellman-group1-sha1
    Ciphers +aes128-cbc

vault-ssh-otp unter windows ( ohne sshpass )

Vault ist ein Passwort Manager und mehr für den professionellen Einsatz. Die Sicherheitsfeatures sind beeindruckend und das alles in einem OpenSource Tool das keinen Cent kostet. Unter anderem bietet das Tool die Möglichkeit OneTimePasswords (otp) zu erstellen. Unter Linux sind die otp einfach zu nutzen unter Windows leider nicht ganz so einfach.

Um eine ähnlich komfortabele Lösung für Windows Benutzer zu bieten habe ich hier ein kleines Powershell Skript geschrieben.
Es wird putty vorausgesetzt anderenfalls umschreiben ;-)

Hier gehts zu Vault von Hashicorp : https://www.vaultproject.io/

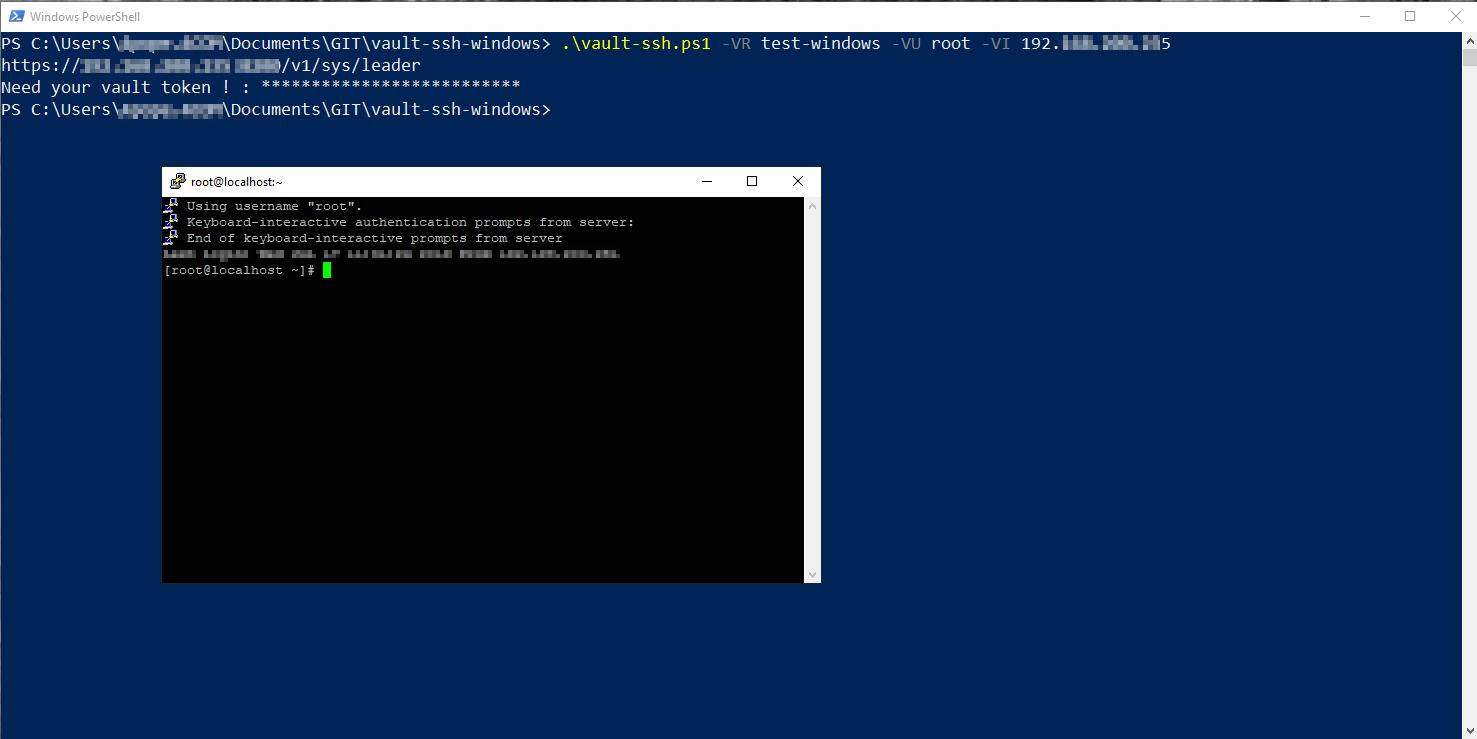
Eine Anmeldung mit einem Token sieht dann so aus :
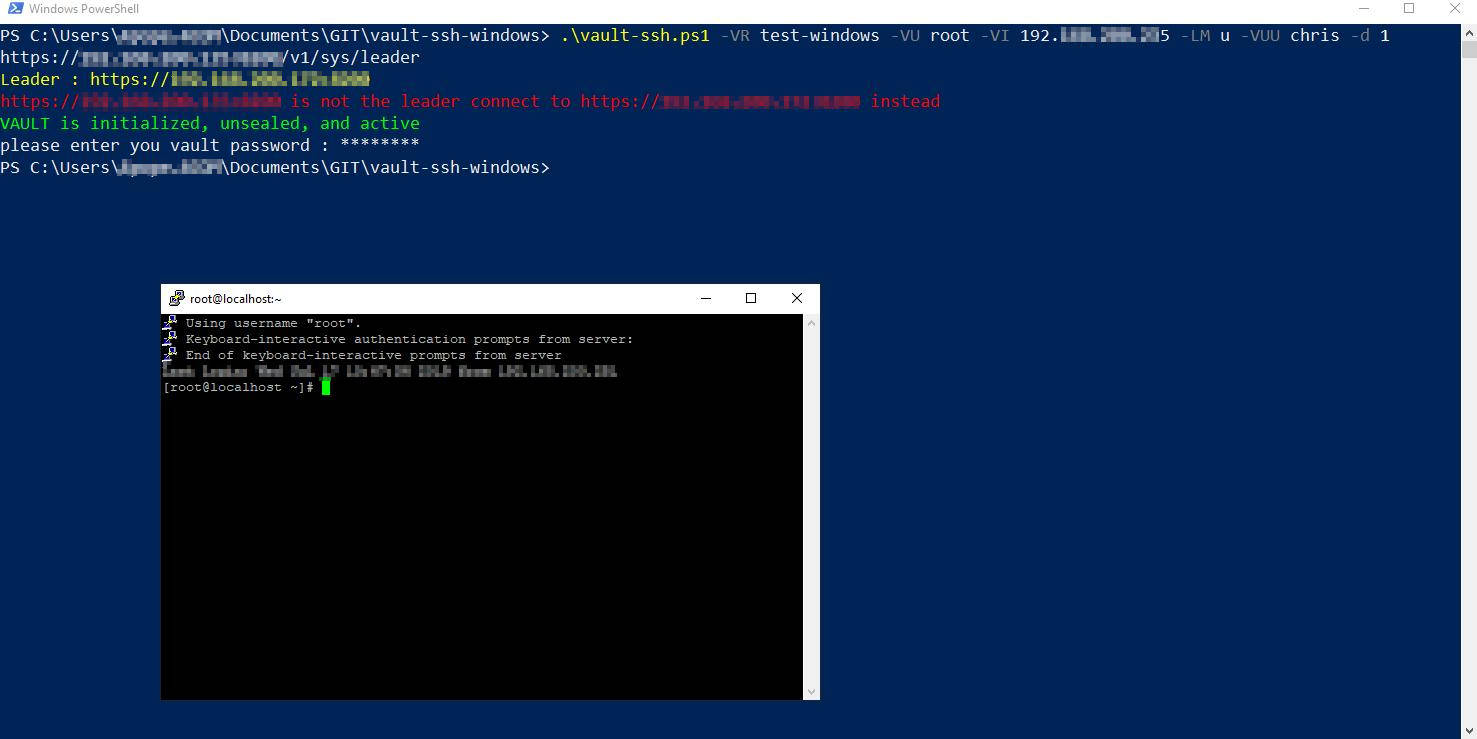
vault-ssh-windows token
Eine Anmeldung mit user/pass ist auch möglich:
vault-ssh-windows userpass


# vault-ssh.ps1 for windows tested on Powershell 5.1
# you need an puuty installation, NOT ONLY THE EXE FILE !
# read parameter
param (
    [string]$VR,
    [string]$VU,
    [string]$VI,
    [string]$VUU,
    [string]$LM="t",
    [int]$d=0
)
# function
function show_help {
  Write-Host ""
  Write-Host "-VR Vault Role"
  Write-Host "-VU User for target host"
  Write-Host "-VI IP address for target host"
  Write-Host "-LM define the login method ( use u / t for userpass / token default ist token)"
  Write-Host "      if you use userpass -VUU is required"
  Write-Host "        -VUU vault username"
  Write-Host "-d 1 activate debug mode (default is -d 0)"
  Write-Host ""
  Write-Host "examples :"
  Write-Host "---------------------------------------------------------------"
  Write-Host "                            TOKEN"
  Write-Host "---------------------------------------------------------------"
  write-Host "vault-ssh.ps1 -VR admin -VU root -VI 192.168.2.1"
  Write-Host "---------------------------------------------------------------"
  Write-Host "                            USERPASS"
  Write-Host "---------------------------------------------------------------"
  write-Host "vault-ssh.ps1 -VR admin -VU root -VI 192.168.2.1 -LM u -VUU YOUR_USERNAME"
  Write-Host " "
  
  exit 0
}
# check parameter
if ([string]::IsNullOrWhitespace($VR) -or [string]::IsNullOrWhitespace($VU) -or [string]::IsNullOrWhitespace($VI)) {
  Write-Host -ForegroundColor Yellow "not enough parameter !"
  show_help
}
# get vault address
try {
    $VAULT_SRV=$env:VAULT_ADDR
} catch {
    Write-Host -ForegroundColor Red "Environment Variable VAULT_ADDR not found please set the Enviroment with 'setx VAULT_ADDR ADDRESS_TO_VAULT_HA'"
    exit 99
}
# get vault master #
try {
  # /sys/leader
  $VAULT_LEADER=Invoke-RestMethod -Method Get -Uri "$VAULT_SRV/v1/sys/leader" | ConvertTo-Json | ConvertFrom-Json
  [string]$VAULT_LEADER_ADDR=$VAULT_LEADER.leader_address
  # debug output
  if ( $d -eq 1 ) { Write-Host -ForegroundColor Yellow "Leader : $VAULT_LEADER_ADDR " }
  if ( $VAULT_LEADER_ADDR -ne $VAULT_SRV ) {
    # debug output
    if ( $d -eq 1 ) { Write-Host -ForegroundColor Red "$VAULT_SRV is not the leader connect to $VAULT_LEADER_ADDR instead" $msg }
    $VAULT_SRV=$VAULT_LEADER_ADDR
  } else {
    # debug output
    if ( $d -eq 1 ) { Write-Host -ForegroundColor Yellow "VAULT_ADDR is the leader address" }
  }
} catch {
  Write-Host -ForegroundColor Red "could not get vault master !"
  Exit 99
} 
# check vault health 
try {
    $VAULT_REQ=Invoke-WebRequest -Uri "$VAULT_SRV/v1/sys/health" -Method GET -UseBasicParsing
    $VAULT_STATUS=$VAULT_REQ.StatusCode
    switch ($VAULT_STATUS) {
        # check status code 
        200 { 
              $msg="VAULT is initialized, unsealed, and active"
              $vok="Green"
            }
        429 { 
              $msg="VAULT is unsealed and standby"
              $vok="Yellow"
            }
        472 { 
              $msg="VAULT is in data recovery mode replication secondary and active"
              $vok="Yellow"
            }
        473 { 
              $msg="VAULT is in performance standby"
              $vok="Yellow"
            }
        501 { $msg="VAULT is not initialized"
              $vok="Red"
            }
        503 { 
              $msg="VAULT ist sealed"
              $vok="Red"
            }
    }
} catch {
    Write-Host -ForegroundColor Red "Could not check vault status ! is the address correct ? $VAULT_SRV"
    Exit 97
}
# debug output 
if ( $d -eq 1 ) { Write-Host -ForegroundColor $vok $msg }
switch ($LM) {
  "t" {
      # get vault-token 
      try {
        $VAULT_TOKEN=$env:VAULT_TOKEN
        if ([string]::IsNullOrWhitespace($VAULT_TOKEN)) {
          # if no enviroment set ask for token
          $VAULT_TOKEN=Read-Host -AsSecureString "Need your vault token ! "
          }
        } catch {
          Write-Host -ForegroundColor Red "an error occured - vault token"
          Exit 98
        }
        # no token no cookies 
        if ([string]::IsNullOrWhitespace([System.Runtime.InteropServices.Marshal]::PtrToStringAuto([System.Runtime.InteropServices.Marshal]::SecureStringToBSTR($VAULT_TOKEN)))) { Write-Host -Foreground Red "no token given ... how do you think does an authentification work ?" ; exit 90}
        # get ssh otp from vault 
        $vhead = @{
          'X-Vault-Token' = [System.Runtime.InteropServices.Marshal]::PtrToStringAuto([System.Runtime.InteropServices.Marshal]::SecureStringToBSTR($VAULT_TOKEN))
        }
        $VAULT_OTP_REQ=Invoke-RestMethod -Uri $VAULT_SRV/v1/ssh/creds/$VR -Method Post -headers $vhead -Body "{ `"ip`": `"$VI`" }" | ConvertTo-Json | ConvertFrom-Json
        $VAULT_OTP=$VAULT_OTP_REQ.data.key
        # run putty 
        try {
          putty.exe -ssh $VU@$VI -pw $VAULT_OTP
        } catch {
          Write-Host -ForegroundColor Red "putty.exe not find please define the path in enviroment variables"
          Exit 96
        }
      }
    "u" {
      $VUP=Read-Host -AsSecureString "please enter you vault password "
      $VUP_E = [System.Runtime.InteropServices.Marshal]::PtrToStringAuto([System.Runtime.InteropServices.Marshal]::SecureStringToBSTR($VUP))
      try {
        # login vault 
        $VLogIn=Invoke-RestMethod -Uri $VAULT_SRV/v1/auth/userpass/login/$VUU -Method Post -Body "{ `"username`": `"$VUU`" , `"password`": `"$VUP_E`"}" | ConvertTo-Json | ConvertFrom-Json
      } catch {
        Write-Host -ForegroundColor Red "Wrong Password ?"
        Exit 92
      }
      $vhead = @{
        # set token to client_token get from login 
        'X-Vault-Token' = $VLogIn.auth.client_token
      }
      try {
        # get otp password 
        $VAULT_OTP_REQ=Invoke-RestMethod -Uri $VAULT_SRV/v1/ssh/creds/$VR -Method Post -headers $vhead -Body "{ `"ip`": `"$VI`" }" | ConvertTo-Json | ConvertFrom-Json
      } catch {
        Write-Host -ForegroundColor Red "could not get client_token"
        Exit 93
      }
      $VAULT_OTP=$VAULT_OTP_REQ.data.key
       # run putty 
       try {
        putty.exe -ssh $VU@$VI -pw $VAULT_OTP
       } catch {
        Write-Host -ForegroundColor Red "putty.exe not find please define the path in enviroment variables"
        Exit 96
      }
  }
}


Quellen :
https://www.hashicorp.com/

Terraform & cloud-init & vmware

Automatisiertes Deployment von virtuellen Maschinen in eine VMWare Umgebung mit Hilfe von Terraform und cloud-init.

als wird ein Terraform Konfiguration benötigt. Ich habe das alles in 3 Dateien aufgeteilt.
  • main.tf
  • terraform.tfvars
  • variables.tf
zuerst erstellen wir die Datei variables.tf um warm zu werden ;-)
variable "vsphere_server" {}
variable "vsphere_user" {}
variable "vsphere_password" {}
variable "vsphere_name" {}
variable "vsphere_dom" {}
variable "vsphere_datacenter" {}
variable "vsphere_datacenter_folder" {}
variable "vsphere_datastore" {}
variable "vsphere_resource_pool" {}
variable "vsphere_network" {}
variable "vsphere_template" {}
variable "vsphere_guest_id" {}
dann setzen wir die Variablen in der neuen Datei terraform.tfvars
# define the vsphere server
vsphere_server = "dev-vm-test-cl-01.demo.local"
# the username to access (use \\ instead \)
vsphere_user = "vsphere.local\\dev"
# password for the user
vsphere_password = "..................."
# name of the guest system
vsphere_name = "demo-vm"
# domain name 
vsphere_dom = ".demo.local"
# datacenter in vmware
vsphere_datacenter = "demo-dc"
# if you use folders define here
vsphere_datacenter_folder = "DEMO"
# datastore to store the machine
vsphere_datastore = "DEMOSAN"
# resource pool 
vsphere_resource_pool = "DEMO"
# the name of the network who the machine should use
vsphere_network = "DEMO-NETZ"
# which template should terraform use to build the machine ?
vsphere_template = "CENTOS-7-DEMO"
# define the guest id
vsphere_guest_id = "centos7_64Guest"
um das deploment durchzuführen benötigen wir noch einen user für die Anmeldung am Gast den wir in der main.tf definieren können hierzu erstellen wir uns erstmal den passwort hash. Ich hab hier mal einfach TEST genommen für ein produktives Deployment nicht zu empfehlen !
python3 -c 'import crypt,getpass; print(crypt.crypt(getpass.getpass(), crypt.mksalt(crypt.METHOD_SHA512)))'
Password:
xxxxxxxxxxxxxxxxxxxxx1Q0T3BfTTFcA.T7byqXbNyyyyyyyyyyyyyyyyyyy
jetzt kümmern wir uns um die main.tf die das eigentliche deployment übernimmt. Die user-data und meta-data werden der Maschine direkt als Template mitgegeben, für mehr Informationen zu cloud-init könnt ihr hier die Doku lesen.
provider "vsphere" {
        vsphere_server = "${var.vsphere_server}"
        user = "${var.vsphere_user}"
        password = "${var.vsphere_password}"
        allow_unverified_ssl= true
}

data "vsphere_datacenter" "dc" {
         name = "${var.vsphere_datacenter}"
}

data "vsphere_datastore" "datastore" {
        name = "${var.vsphere_datastore}"
        datacenter_id = "${data.vsphere_datacenter.dc.id}"
}

data "vsphere_resource_pool" "pool" {
  name          = "${var.vsphere_resource_pool}"
  datacenter_id = "${data.vsphere_datacenter.dc.id}"
}

data "vsphere_network" "network" {
  name          = "${var.vsphere_network}"
  datacenter_id = "${data.vsphere_datacenter.dc.id}"
}

data "vsphere_virtual_machine" "template" {
  name          = "${var.vsphere_template}"
  datacenter_id = "${data.vsphere_datacenter.dc.id}"
}

data "template_file" "meta_init" {
        template = <<EOF
{
        "local-hostname": "$${local_hostname}"
}
EOF

vars = {
        local_hostname = "${var.vsphere_name}${var.vsphere_dom}"
}
}

data "template_file" "cloud_init" {
        template = <<EOF
#cloud-config
# set hostname & keyboard layout
bootcmd:
  - [ sh, -c, "echo 'DEPLOY-DATE-TIME - $${deploy_date}' > /cloud-init-info.txt"]
  - [ localectl, set-keymap, de ]
  - [ hostnamectl, set-hostname, $${hostname} ]
  - [ setenforce, 0 ]
  - [ sed, -i, 's/enforcing/disabled/g', /etc/selinux/config ]
growpart:
  mode: auto
  devices: ['/']
  ignore_growroot_disabled: false
users:
  - name: demo
    groups: wheel
    lock_passwd: false
    passwd: xxxxxxxxxxxxxxxxxxxxx1Q0T3BfTTFcA.T7byqXbNyyyyyyyyyyyyyyyyyyy
    shell: /bin/bash
    sudo: ['ALL=(ALL) NOPASSWD:ALL']
    ssh-authorized-keys:
      - ssh-rsa AAAAB................. DEPLOY@HOST
# set root password 
chpasswd:
  list: |
     root:xxxxxxxxxxxxxxxx4IlB$pLkby1WsExxxxxxxxxxxxxxxx
EOF
        vars = {
                hostname = "${var.vsphere_name}${var.vsphere_dom}"
                deploy_date = formatdate ("DD'.'MM'.'YYYY hh:mm ZZZ",timestamp())
        }
}

resource "vsphere_virtual_machine" "vm" {
  name             = "${var.vsphere_name}${var.vsphere_dom}"
  resource_pool_id = "${data.vsphere_resource_pool.pool.id}"
  datastore_id     = "${data.vsphere_datastore.datastore.id}"
  folder           = "${var.vsphere_datacenter_folder}"
  num_cpus = 4
  memory   = 8096
  guest_id = "${var.vsphere_guest_id}"

  network_interface {
    network_id = "${data.vsphere_network.network.id}"
  }

  disk {
    label = "disk0"
    size  = 150
  }

  clone {
    template_uuid = "${data.vsphere_virtual_machine.template.id}"
  }

  extra_config = {
        "guestinfo.metadata" = "${base64gzip(data.template_file.meta_init.rendered)}"
        "guestinfo.metadata.encoding" = "gzip+base64"
        "guestinfo.userdata" = "${base64gzip(data.template_file.cloud_init.rendered)}"
        "guestinfo.userdata.encoding" = "gzip+base64"
        }
}
Terrafom & cloud-init wäre dann fertig , jetzt müssen wir uns noch ein Image bauen. Ich habe dafür das CentOS-7-x86_64-GenericCloud.qcow2 Image von CentOs heruntergeladen. Und wie hier beschrieben konvertiert. Für die Anpassung des Templates musste ich mir eine extra cloud-config schreiben die nur eins macht, einen Benutzer mit login anlegen ;-) Dazu habe ich mir unter Ubuntu das Packet cloud-utils installiert. Dann erstellst du eine Datei config.yaml mit diesem Inhalt.
#cloud-init
users:
  - name: image
    groups: wheel
    lock_passwd: false
    passwd: $6$..............................zVjyZr4fj1
    shell: /bin/bash
    sudo: ['ALL=(ALL) NOPASSWD:ALL']
    ssh-authorized-keys:
      - DEIN SSH KEY
dann bauen wir daraus ein ISO File
cloud-localds config.iso config.yaml
Jetzt muss die konvertierte vmdk auf den Datastore hochgeladen werden. Dann eine neue Maschine anlegen und als Festplatte die vorhandene vmdk Datei auswählen, in das CDROM die hochgeladene iso Datei einlegen und verbinden (auch beim einschalten). Beim Bootvorgang sieht cloud-init die cd und erkennt die user-data darauf. Es wird ein User angelegt der zuvor definiert wurde. Ich lasse das ISO auf dem Datastore für kommende Images die ich erstellen muss. Wir ihr das Passwort erstellt habe ich ja bereits weiter oben erklärt.Nach dem erstellen der VM anmelden und dann installieren wir im system noch open-vm-tools und cloud-init-vmware-guestinfo
yum install open-vm-tools
Jetzt machen wir die Kiste noch sauber das man ein sauberes Image ziehen kann. Das ist bereits hier schön erklärt. Wenn du damit fertig bist die virtuelle Maschine ausschalten und in ein Template klonen, am besten nimmst du als Namen für das Template CENTOS-7-DEMO. Jetzt sollte wenn du bootest ein neuer Benutzer angelegt werden mit dem Namen und dem Passwort TEST. selinux sollte ausgeschaltet sein usw....

Quellen :
https://stafwag.github.io/blog/blog/2019/03/03/howto-use-centos-cloud-images-with-cloud-init/
https://superuser.com/questions/1307260/convert-qcow2-image-to-vsphere-vmdk
https://stackoverflow.com/questions/37794846/convert-qcow2-to-vmdk-and-make-it-esxi-6-0-compatible
https://github.com/vmware/cloud-init-vmware-guestinfo
https://github.com/vmware/simple-k8s-test-env/tree/master/e2e
https://blah.cloud/infrastructure/using-cloud-init-for-vm-templating-on-vsphere/
https://community.spiceworks.com/how_to/151558-create-a-rhel-centos-6-7-template-for-vmware-vsphere
https://cloudinit.readthedocs.io/en/latest/
“Das einzig sichere System müsste ausgeschaltet, in einem versiegelten und von Stahlbeton ummantelten Raum und von bewaffneten Schutztruppen umstellt sein.”
Gene Spafford (Sicherheitsexperte)