Intune Force Reinstall an Intune App with PowerShell

Sometimes a Microsoft Intune application needs to be reset because installation data is stuck or the app must be forced to reinstall. This PowerShell tool helps by loading a list of apps from a CSV file, letting the operator choose one, and then cleaning up related Intune Management Extension registry entries. It also reminds the user to restart the device and sync in Company Portal after the cleanup.

What the script does
The script reads application entries from a local Apps.csv file and shows them in a graphical selection window. After an app is selected, it checks whether the application still appears to be installed and, if necessary, asks for a manual uninstall before continuing. It then removes matching Intune Management Extension registry entries for the selected AppID and finishes with a restart and sync reminder.

Requirements
- PowerShell script file (.ps1).
- Apps.csv stored in the same folder as the script.
- Administrative privileges.
- Out-GridView available on the system.

CSV file App.csv structure
The script expects a file named Apps.csv in the same directory as the PowerShell script. The file must use a semicolon as delimiter and contain the following three columns: Application, ShortName, and AppID.
The Application column is the display name shown in the selection window, while the AppID column is the unique Intune application ID used later to locate and remove the related registry entries. The ShortName column is only used to identify whether the selected application still appears to be installed on the device.

Example structure:

Application;ShortName;AppID
7-Zip 24.08 (MSI-x64);7-Zip;6c3ea4df-0362-4f76-b7b9-6feea87f1288
Greenshot 1.2.10.6;Greenshot;03940c5e-bfab-4265-b669-aec94c33b711
KeePass 2.58.0 (MSI);KeePass;37e9bbfc-d194-4982-be34-e8d12634ebd2
Office 365 x32 en-US;Office;cb3d3f28-9140-48e9-91e0-611ef7994822
Office 365 x64 en-US;Office;fdab9780-ac85-46ff-880d-47de8474f602
Office 365 x64 de-DE;Office;e71f3a84-06d4-4957-a55d-66e4c39f755b
PDF-XChange 10.6.0.396 x64;PDF-XChange;aa0487f4-5aff-475d-8099-f652a08a0b66


Note about ShortName
The second column, ShortName, is not used for the Intune cleanup itself. It is only used in the script to check whether the selected application still seems to be installed by matching it against installed packages on the system. This is why the value should be short and practical, for example Office, KeePass, or 7-Zip, so the package lookup can detect an existing installation more reliably. The actual cleanup of Intune-related registry entries is based on the AppID, not on ShortName.

Practical notes
This approach is useful when a Win32 app deployment gets stuck in a bad state and a normal reinstall is not enough. Because the script works directly against Intune Management Extension registry data, it should be used carefully and only by administrators who understand the impact. A short manual uninstall step before cleanup helps avoid conflicts during the reinstall process.

GitHub download
Download the script here: Intune/Force Reinstall Of Intune Apps
Zabbix Automated Agent Install and Update with PowerShell

This PowerShell script is designed to run as a scheduled task on servers and keep the Zabbix Agent installation up to date automatically. The task is triggered through a GPO, so each server checks its local installation source on its own and updates itself when a newer version is available. This makes the deployment process simple, scalable, and low-maintenance across many servers.

The script also handles the first installation case. If no Zabbix Agent is installed yet, the script installs it automatically from the files available in the local install directory. If an older version is already present, the script stops the service, removes the old agent, copies the updated files, installs the new version, and starts the service again.

How it works
The script first compares the version of the Zabbix Agent in the source folder with the version currently installed on the server. If a newer version is found, it performs an update. If no agent is installed at all, it performs a fresh installation. If the installed version is already current, no changes are made.

This approach is especially useful in environments where Zabbix agents are staged centrally and then maintained locally by a scheduled task. It removes the need for manual updates and ensures that servers stay aligned with the version stored in the installation repository.

Configuration handling
The script also checks whether the Zabbix configuration file already exists. If a valid configuration file is present, it is left untouched. If no configuration file is found, the script uses the Zabbix default logic and creates the active configuration file from the default file. This ensures that the original configuration is not overwritten and that a new config is only created when none exists yet.

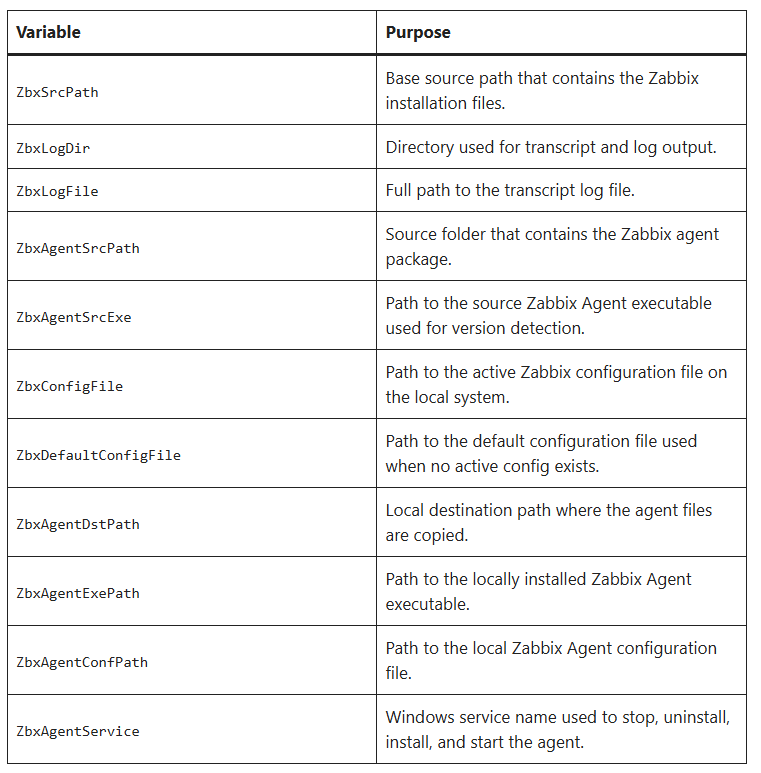
Variable overview


GitHub download
Download the script here from GitHub repository: Install_Update_Zabbix_Agent.ps1

Zabbix Website Do Not Open: HTTP 500 Error

If individual Zabbix pages do not open and instead show an HTTP 500 error, the most likely cause is that PHP has been assigned too little memory. In practice, this often happens when Zabbix tries to render a page that needs more resources than the current PHP memory_limit allows.

Error Analysis in nginx Logs

The fastest way to confirm the problem is to check the nginx error log for memory-related messages. The log file is usually located here:
/var/log/nginx/error.log

To watch the log in real time, use:
tail -f /var/log/nginx/error.log

If the issue is memory-related, you will typically find a message like this:
Allowed memory size of xxxxxx bytes exhausted

A real example may look like this:
2022/12/08 17:13:35 [error] 12315#12315: *355 FastCGI sent in stderr: "Passing INI directive through FastCGI: unable to set 'always_populate_raw_post_data'
PHP message: PHP Fatal error: Allowed memory size of 268435456 bytes exhausted (tried to allocate 20480 bytes) in /usr/share/zabbix/include/classes/api/CRelationMap.php on line 77
PHP message: PHP Fatal error: Allowed memory size of 268435456 bytes exhausted (tried to allocate 20480 bytes) in /usr/share/zabbix/include/func.inc.php on line 1071" while reading response header from upstream, client: 172.18.7.147, server: zabbix.domain.de, request: "GET /zabbix.php?action=host.view HTTP/1.1", upstream: "fastcgi://unix:/run/php/php7.2-fpm.sock:", host: "zabbix.domain.de", referrer: "https://zabbix.domain.de/overview.php"
The important part is the Allowed memory size ... exhausted message. That clearly shows that PHP ran out of memory while processing the request.

Fixing the PHP Memory Limit
To solve the issue, increase the PHP memory limit in the nginx site configuration file. In your case, the relevant file is:
/etc/nginx/sites-enabled/http.zabbix.domain.de.conf

Before changing anything, it is a good idea to create a backup of the file. Then open it with a text editor such as Nano and adjust the memory_limit value.

Example:
sudo nano /etc/nginx/sites-enabled/http.csizabbix.sk-ad.de.conf

Inside the configuration, change the line:
memory_limit = xxxM

to a higher value, for example:
memory_limit = 512M


Restarting the Services
After updating the configuration, restart both PHP-FPM and nginx so the new setting takes effect.
sudo systemctl restart php7.2-fpm.service
sudo systemctl restart nginx.service
sudo systemctl restart php7.2-fpm.service
sudo systemctl restart nginx.service

Once both services are restarted, the Zabbix pages should open again if the HTTP 500 error was caused by the memory limit.

Short Conclusion
An HTTP 500 error in Zabbix does not always mean a broken application. In many cases, the real issue is simply that PHP does not have enough memory to render the requested page. Checking the nginx error log is the best first step, and increasing the PHP memory_limit usually resolves the problem.

Zabbix Value Cache Running on Low Memory Mode

This warning usually appears together with the dashboard message:

More than 75% used in the configuration cache
Together, these messages indicate that the cache allocated for Zabbix events and configuration data is too small. In many cases, this is only a temporary situation. For example, a proxy may have been disconnected for a longer period and then starts sending a large number of queued events back to the central Zabbix server all at once.

In your case, the issue appeared after a Zabbix upgrade. Once the proxies reconnected, they delivered their stored events, and that created a temporary load spike that exceeded the available cache size.

What the message means
The value cache is used by Zabbix to store frequently accessed data in memory. If that cache becomes too small, Zabbix falls back into a low memory mode and starts warning that the cache is under pressure. This does not always mean the system is broken, but it is a clear sign that the current cache size is no longer sufficient for the workload.

In larger environments, this can happen after upgrades, after proxy reconnects, or during periods of unusually high event volume. If the cache remains too small for a longer time, performance can degrade and Zabbix may become slower when processing new events or queries.

How to fix it
The cache size must be adjusted in the Zabbix server configuration file on the Zabbix server. The configuration file is located in:
/etc/zabbix

Open the file zabbix_server.conf with a text editor such as Nano and search for the cachesize parameter.

Example:
sudo nano /etc/zabbix/zabbix_server.conf

You wil find a value that looks like:
### Option: CacheSize
CacheSize=4G

The current value in this case is set to 4GB. If the system keeps reporting cache pressure, this value should be increased to give Zabbix more room for events and configuration data.

After saving the file, restart the Zabbix server service so the new setting is loaded:
sudo systemctl restart zabbix-server

Why this happened
This kind of issue is often temporary and can be triggered by a sudden backlog of data. A proxy that was offline for some time may reconnect and forward many events at once. After a Zabbix update, the system may also briefly experience a higher load because proxies and the server need to catch up with pending data.

That is why cache-related messages are not always a sign of a permanent configuration problem. However, if they appear repeatedly, increasing the cache size is the correct long-term fix.

Short conclusion
The messages about low memory mode and configuration cache usage mean that the Zabbix server cache is under pressure. In your case, the most likely cause was the event backlog after the upgrade and proxy reconnects. Increasing the cachesize value in zabbix_server.conf and restarting the Zabbix server should resolve the issue.

Powershell to set new DNS Server for DHCP Reservations

I have IP reservations in my DHCP server for some clients. In this reservations I set an special DNS server for special name resolution. But now I have to change this IP because the DNS service was moved to a new server with new IP address.
I'm ltry to write a script which will change the DNS entry in all my reservation.

Solution:
I create a CSV file with all IP addresses which should be changed to the new DNS server (easy export from DHCP Server).
The column with the IP addreses in the CSV file needs a heading called "IP" and save the CSV in UTF-8 format with Delimiter ";" (even if we don't need it here).

Script to change the settings with log file

# new IP auf DNS server 
$NewDNS = '192.168.100.100'

# import csv file with all IPs
$IPs = Import-Csv -Path "C:\data\reservations.csv" -Delimiter ";" -Encoding "UTF8"

# write a log file
Start-Transcript -Path "C:\data\Set_New_DHCP_Settings.log"

# loop through all imported IP addresses
foreach ($IP in $IPs){

    # change the OptionId 6 (DNS server) for the IPs
    Write-Host "IP:" $IP.IP "Type:" $IP.Type "- Set new DNS server:" $NewDNS
    Set-DhcpServerv4OptionValue -ReservedIP $IP.IP -OptionId 6 -Value $NewDNS -Verbose
    
}

#Stop log file writing
Stop-Transcript 


If you need to change another DHCP Option you can find all OptionIDs here:
iana.org: DHCP and BOOTP Parameters

Block downloading and installing "Malicious Software Removal Tool" via Update

I'm looking for a methode to block "Malicious Software Removal Tool" updates from being downloaded and installed when doing Windows Update?

Solution:
You can set the following registry key to prevent downloading and installing MRT at windows update process.

Windows Registry Editor Version 5.00

[HKEY_LOCAL_MACHINE\SOFTWARE\Policies\Microsoft\MRT]
"DontOfferThroughWUAU"=dword:00000001


You can download and install the MRT manually without problems but via Microsoft Update or WSUS Update the patch will not downloaded.
“Das einzig sichere System müsste ausgeschaltet, in einem versiegelten und von Stahlbeton ummantelten Raum und von bewaffneten Schutztruppen umstellt sein.”
Gene Spafford (Sicherheitsexperte)