Convert Windows Server Evaluation to Standard/Datacenter Edition

Problem:
You want to convert your windows server evaluation edition to a standard or datacenter edition.

Solution:
Before we can activate the server via KMS or MAC we need to convert the evaluation edition into an standard or datacenter.

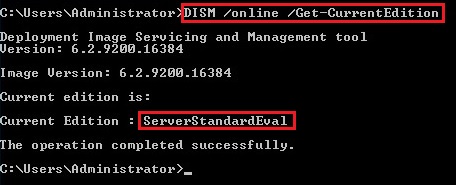
Check the current Edition

DISM /online /Get-CurrentEdition

Here you see the server edition. If it is an ServerXXXEval you must convert the server edition into standard or datacenter


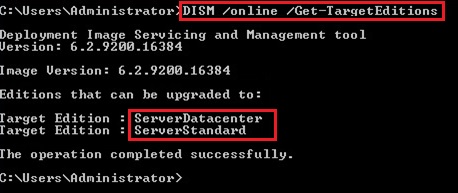
Check the possible target editions

To check the possible target edition, you can execute the next command:

DISM /online /Get-TargetEditions


Convert the eval to standard or datacenter edition

ATTENTION: The next step will need an intermediate reboot of the server!!
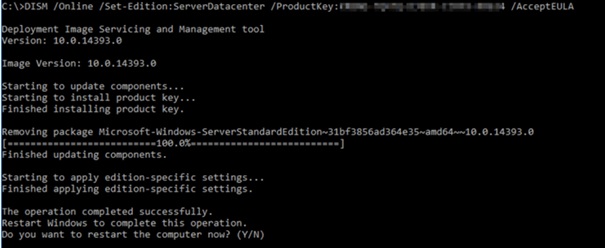
Now you can convert your evaluation edition to the target edition with the command below:

Standard:
DISM /online /Set-Edition:ServerStandard /ProductKey:XXXXX-XXXXX-XXXXX-XXXXX-XXXXX /AcceptEula

Datacenter
DISM /online /Set-Edition:ServerDatacenter /ProductKey:XXXXX-XXXXX-XXXXX-XXXXX-XXXXX /AcceptEula


For the product key please use the generic volume license keys from the table below. With this keys you can also activate the server via KMS. If you have MAC Keys please use this keys for converting.

Server 2022 Standard VDYBN-27WPP-V4HQT-9VMD4-VMK7H
Server 2022 Datacenter WX4NM-KYWYW-QJJR4-XV3QB-6VM33
Server 2019 Standard N69G4-B89J2-4G8F4-WWYCC-J464C
Server 2019 Datacenter WMDGN-G9PQG-XVVXX-R3X43-63DFG
Server 2016 Standard WC2BQ-8NRM3-FDDYY-2BFGV-KHKQY
Server 2016 Datacenter CB7KF-BWN84-R7R2Y-793K2-8XDDG

VMWare Workstation: Netapp Simulator hängt scheinbar beim Booten

Problem
Nach der initialen Einrichtung des Netapp Simulators unter VMWare ESX oder VMWare Workstation scheint das ONTAP beim Starten stehen zu bleiben. Nach einigen Minuten ist der Node oder Cluster aber per SSH und HTTPS erreichbar.


Lösung
Leider handelt es sich hier um einen BUG, der nicht gefixt wird (weder VMWare noch Netapp).
Entweder man ignoriert das Verhalten, da der Cluster bzw. Node nach der Bootvorgang ganz normal erreichbar ist, oder man kann im VLOADER anpassen, damit die Anzeige korrekt ist. Das ist vor allem im Fehlerfall hilfreich!
Die Anpassung muss aber JEDES MAL gemacht werden und ist nicht persistent:

- Bootvorgang des Nodes am Anfang (Countdown) mit einer non-Enter-Taste unterbrechen.
- Der Prompt "VLOADER>" wird angezeigt
- Hier den Befehl "setenv screen.textmode 1" eingbene
- Bootvorgang mit dem Befehl "boot_ontap" starten
- Die Anzeige ist nun korrekt und der Bootvorgang wird vollständig angezeigt


Quelle:
ONTAP Select node 9.13.1 appears to hang during boot

VirtualBox: Set DmiSystemVendor Installation ROK Datenträger Windows

Problem:
Wir wollten einen physikalischen Server inkl. Applikation auf einen virtuell Server umziehen und from scratch neu installieren (kein P2V). Hierzu mussten wir die originalen Installationsmedien des Herstellers verwenden, da es sich um eine ROK-Lizenzen gehandelt. Bei der Installation in einer VM unter VirtualBox kam der Hinweis, dass das installationsmedium Vendor branded ist und die Installation bricht ab.

Lösung:
Man kann der VM unter VirtualBox einen Vendor BIOS Tag mitgeben, damit die Installation funktioniert. Das konnten wir bei Fujitsu und HP sauber abbilden.

Folgende Befehle haben hier den Vendor im BIOS gesetzt:

Fujitsu
VBoxManage setextradata "Analysis" "VBoxInternal/Devices/pcbios/0/Config/DmiSystemVendor"      "FUJITSU"
VBoxManage setextradata "Analysis" "VBoxInternal/Devices/pcbios/0/Config/DmiBIOSVendor"        "FUJITSU // Phoenix Technologies Ltd."

HP
VBoxManage setextradata "VM Name" "VBoxInternal/Devices/pcbios/0/Config/DmiBIOSVendor" "HP"
VBoxManage setextradata "VM Name" "VBoxInternal/Devices/pcbios/0/Config/DmiSystemVendor" "HP"


Ein überblick aller Befehle findet man hier: Configuring the BIOS DMI Information

Powershell: Unpin App from Taskbar

Problem:
Ich habe nach einer Möglichkeit gesucht den Internet Explorer von der Taskleiste auf unseren Terminalservern zu entfernen und den Edge dafür zu setzen. Die Ernüchterung war, dass Unpin funktioniert, aber Pin nicht mehr unterstützt wird. Somit konnte ich zumindest den Internet Explorer von der Taskleiste entfernen.

Unpin App from Tasskbar

Deutsches OS
$appname = "Internet Explorer"
((New-Object -Com Shell.Application).NameSpace('shell:::{4234d49b-0245-4df3-b780-3893943456e1}').Items() | ?{$_.Name -eq $appname}).Verbs() | ?{$_.Name.replace('&','') -match 'Von Taskleiste lösen'} | %{$_.DoIt(); $exec = $true}


Englisches OS
$appname = "Internet Explorer"
((New-Object -Com Shell.Application).NameSpace('shell:::{4234d49b-0245-4df3-b780-3893943456e1}').Items() | ?{$_.Name -eq $appname}).Verbs() | ?{$_.Name.replace('&','') -match 'Unpin from taskbar'} | %{$_.DoIt(); $exec = $true}

Set NTFS Permissions via Powershell

Für die Migration eines Fileservers musste ich die NTFS-Berechtigungen neu setzen. Da mir die manuelle Berechtigung zu umständlich war, wollte ich das per Powershell durchführen. Die Berechtigung ist nicht ganz einfach zu setzen und auch nicht gleich verständlich. Hier ein Skript, welches ich verwendet habe um die entsprechenden Berechtigungen zu setzen. darin sind auch einige Ausführungen beinhaltet.

Eine sehr gute Übersicht wie ACLs zu setzen sind, findet man hier:
blue42: Changing NTFS Security Permissions using PowerShell

<# 
.NAME
    Set-NTFSPermissions.ps1

.AUTHOR
    Ralf Entner

.SYNOPSIS
    Script set NTFS permissions for a folder.

.DESCRIPTION 
    Script set NTFS permissions for a folder. 
    It will get the original acces controll list (ACL), adds the permissions, remove inhitered permissions and save the new ACL.
 
.NOTES 

.COMPONENT 
    No powershell modules needed

.LINK 
    https://blue42.net/windows/changing-ntfs-security-permissions-using-powershell/#propagation-flags
 
.Parameter ParameterName 

#>


# Folder
$Folder = "C:\Data\Produktion"

# Get ACL From Folder
$acl = Get-Acl -Path $Folder

# Generate access tokens

# 1: group (with domain part)
# 2: permission
# 3: inheritance flag
# 4: propagation flag
# 5: allow or deny permission
# For flags 3 and 4 look at: https://blue42.net/windows/changing-ntfs-security-permissions-using-powershell/#propagation-flags

$mdRule = New-Object System.Security.AccessControl.FileSystemAccessRule("acme\FS_Produktion_M","Modify","ContainerInherit,ObjectInherit","None","Allow")
$roRule = New-Object System.Security.AccessControl.FileSystemAccessRule("acme\FS_Produktion_R","ReadAndExecute","ContainerInherit,ObjectInherit","None","Allow")

# Disable/Enable inheritance (keep or delete inherited permissions)
# The first $true says we are blocking inheritance from the parent folder. The second parameter $false removes the current inherited permissions.
# OPTION 1: Block inheritance, keep inherited permissions and add the new
$acl.SetAccessRuleProtection($true, $true)

# OPTION 2: Block inheritance, remove inherited permissions and set only new
$acl.SetAccessRuleProtection($true, $false)

# Add Modify Rule to ACL Object
$acl.SetAccessRule($mdRule)
$acl.SetAccessRule($roRule)

# Save ACL-object to folder
Set-Acl -Path $folder -AclObject $acl

Powershell S/MIME Certificat Exporter

Ich habe ein Skript benötigt, welches S/MIME Verschlüsselungs-Zertifikate exportiert um diese für eine Client-Migration zu erhalten. Das Skript setzt voraus, dass der S/MIME Private Key exportiertbar ist. Wenn das nicht gegeben ist, dann kann das Zertifikat nur noch an der CA mittels Key Recovery Agent (falls konfiguriert) oder Mimikaz wiederhergestellt werden.

Es kann auch sein, dass die Suchroutine nach dem richtigen Zertifikat angepasst werden muss, je nachdem was man als Key Usage für das S/MIME-Zertifikat hinterlegt hat.

Um des Export möglichst einfach für Endbenutzer zu machen, habe ich hierzu auch eine GUI außenherum gebaut.

<#
.SYNOPSIS
    This script exports an S/MIME certificate with a private key and sends it as an email attachment.
.DESCRIPTION
    This script prompts the user to select an S/MIME certificate, exports it with the private key to a PFX file,
    and then sends an email with the exported PFX file as an attachment. The user is prompted to enter a password
    for the private key. After sending the email, the script deletes the PFX file.
.NOTES
    File Name: Export-SMIMECertificate.ps1
    Author   : Ralf Entner
    Date     : 2024-03-24

    Version History:
    1.0 - [2024-03-24] - Initial version.
    1.1 - [2024-04-01] - Only certificate for Encryption and language specific settings 

    Prerequisites:
    - This script requires Windows PowerShell.
    - The user running the script must have permission to access the S/MIME certificate.
    - The script relies on the user having access to Outlook for sending emails.
    - The user must enter a password for certificate export
#>

Add-Type -AssemblyName System.Windows.Forms
Add-Type -AssemblyName System.Drawing

# Create a new instance of Windows Form
$form = New-Object System.Windows.Forms.Form
$form.Text = "S/MIME Certificate Exporter"
$form.Size = New-Object System.Drawing.Size(500,300)
$form.StartPosition = "CenterScreen"

# Create a label for certificate selection
$labelCert = New-Object System.Windows.Forms.Label
$labelCert.Location = New-Object System.Drawing.Point(10,20)
$labelCert.Size = New-Object System.Drawing.Size(460,20)
$labelCert.Text = "Select the S/MIME certificate to export:"
$form.Controls.Add($labelCert)

# Create a dropdown list (ComboBox) for certificates
$comboBoxCert = New-Object System.Windows.Forms.ComboBox
$comboBoxCert.Location = New-Object System.Drawing.Point(10,40)
$comboBoxCert.Size = New-Object System.Drawing.Size(460,20)
$form.Controls.Add($comboBoxCert)

# Create a label for password
$labelPass = New-Object System.Windows.Forms.Label
$labelPass.Location = New-Object System.Drawing.Point(10,80)
$labelPass.Size = New-Object System.Drawing.Size(460,20)
$labelPass.Text = "Enter password for private key:"
$form.Controls.Add($labelPass)

# Create a textbox for password
$textBoxPass = New-Object System.Windows.Forms.TextBox
$textBoxPass.Location = New-Object System.Drawing.Point(10,100)
$textBoxPass.Size = New-Object System.Drawing.Size(460,20)
$textBoxPass.PasswordChar = "*"
$form.Controls.Add($textBoxPass)

# Get OS language for certificate oid friendly name

if((Get-WinSystemLocale).Name -eq "de-dE"){

    $OIDFriendlyName = 'Schlüsselverwendung'

} else{

    $OIDFriendlyName = 'KeyUsage'

}

# Get certificates for "secure email configuration"
$certificates = Get-ChildItem -Path cert:\CurrentUser\My | ?{$_.EnhancedKeyUsageList -like "*1.3.6.1.5.5.7.3.4*"}
# Get only certificates for de/encryption
$certificates = $certificates | Where-Object{ $_.Extensions | Where-Object{ ($_.Oid.FriendlyName -eq $OIDFriendlyName ) -and ($_.Format(0) -like "*(20)*") }}

# Populate the ComboBox with S/MIME certificate subjects
foreach ($cert in $certificates) {
    $comboBoxCert.Items.Add($cert.Thumbprint)
}

# Create an export button
$buttonExport = New-Object System.Windows.Forms.Button
$buttonExport.Location = New-Object System.Drawing.Point(150,140)
$buttonExport.Size = New-Object System.Drawing.Size(200,60)
$buttonExport.Text = "Send S/MIME Certificate via Outlook Mail"
$buttonExport.Add_Click({
    $selectedThumbprint = $comboBoxCert.SelectedItem
    if ([string]::IsNullOrWhiteSpace($selectedThumbprint)) {
        [System.Windows.Forms.MessageBox]::Show("Please select your S/MIME certificate.", "Error", 
        [System.Windows.Forms.MessageBoxButtons]::OK, [System.Windows.Forms.MessageBoxIcon]::Error)
        return
    }

    # Get the selected certificate
    $cert = $certificates | Where-Object {$_.Thumbprint -eq $selectedThumbprint}

    # Export the S/MIME certificate with private key
    $exportPath = $env:TEMP + "\"+ $cert.Thumbprint + ".pfx"
    $password = $textBoxPass.Text

    if ([string]::IsNullOrWhiteSpace($password)) {
        [System.Windows.Forms.MessageBox]::Show("Please enter a password for the certificate.", "Error", 
        [System.Windows.Forms.MessageBoxButtons]::OK, [System.Windows.Forms.MessageBoxIcon]::Error)
        return
    }

    try {
        Export-PfxCertificate -Cert $cert -FilePath $exportPath -Password (ConvertTo-SecureString -String $password -AsPlainText -Force)
        [System.Windows.Forms.MessageBox]::Show("S/MIME Certificate exported successfully.", "Success", 
        [System.Windows.Forms.MessageBoxButtons]::OK, [System.Windows.Forms.MessageBoxIcon]::Information)
    } catch {
        [System.Windows.Forms.MessageBox]::Show("Error exporting S/MIME certificate with private key: $_", "Error",
        [System.Windows.Forms.MessageBoxButtons]::OK, [System.Windows.Forms.MessageBoxIcon]::Error)
        return
    }

    # Create a new Outlook application object
    $outlook = New-Object -ComObject Outlook.Application

    # Create a new mail item
    $mail = $outlook.CreateItem(0)

    # Set email properties
    $mail.Subject = "S/MIME Certificate"
    $mail.Body = "Please find the S/MIME certificate attached."

    # Attach the certificate file
    $attachment = $exportPath
    $mail.Attachments.Add($attachment)

    # Display the mail item
    $mail.Display()

    # Delete the PFX file after sending the email
    Remove-Item -Path $attachment -Force

})
$form.Controls.Add($buttonExport)

# Show the form
$form.ShowDialog() | Out-Null
“Das einzig sichere System müsste ausgeschaltet, in einem versiegelten und von Stahlbeton ummantelten Raum und von bewaffneten Schutztruppen umstellt sein.”
Gene Spafford (Sicherheitsexperte)